I moved my e-mail from GMail some time ago. But I was still using Google to store my contacts and calendar. The situation with contact and calendar data is a bit more complicated, as the standards here are much less clearly defined as with e-mail.
Choosing the software
My requirements were fairly simple. I am using vanilla Android on mobile and standard MacOS apps on desktop. I want to share contacts and calendar between these two. For contacts, one of the major standards is CardDAV, which is an extension of WebDAV. Similarly, for calendars there is CalDAV.
There are not that many choices for open source server software supporting both. At first, I tried using Darwin Calendar Server surprisingly from Apple. It looked like the most mature product, however I was unable to get it running under modern CentOS. After this failure, I arrived at Radicale, which is a simple server written in Python.
This post is more for me as a documentation what I set-up, but maybe it can be useful for you too.
Installation
Radicale can be installed thru pip, the Python package manager. In my configuration, I invoke Python as python3.7, your environment might vary, python may be enough.
# install the package
python3.7 -m pip install --upgrade radicale
Radicale stores the data as plain files in a directory structure, no database required. So the storage preparation consists of creating a directory and setting permissions. I am using the default location of /var/lib/radicale/collections.
# prepare the user we will run under and create data directory
useradd --system --home-dir / --shell /sbin/nologin radicale
mkdir -p /var/lib/radicale/collections
cd /var/lib/radicale/collections
One of the neat features of using plaintext files for storage is, we can use git for versioning of the database and this gives us the possibility to track all changes in the data. Let’s prepare the repo.
# we prepare a git repo for data versioning
git init
git config user.name "Radicale"
git config user.email "radicale@taborsky.cz"

# make the data owned by radicale user
chown -R radicale:radicale /var/lib/radicale/collections
mkdir /etc/radicale
To enable the git versioning, we need to enable storage post-change hook in /etc/radicale/config by adding this:
[storage]
hook = git add -A && (git diff --cached --quiet || git commit -m "Changes by "%(user)s)
As I am running CentOS with systemd, we need to create the service definition in /etc/systemd/system/radicale.service.
[Unit]
Description=A simple CalDAV (calendar) and CardDAV (contact) server
After=network.target
Requires=network.target

[Service]
ExecStart=/usr/local/bin/python3.7 -m radicale
Restart=on-failure
User=radicale
# Deny other users access to the calendar data
UMask=0027
# Optional security settings
PrivateTmp=true
ProtectSystem=strict
ProtectHome=true
PrivateDevices=true
NoNewPrivileges=true

[Install]
WantedBy=multi-user.target
When we have the definition, we can enable the service.
systemctl enable radicale
systemctl start radicale
Now we have Radicale running on a local port 5232, but it is not accessible from the internet. You could open the port on the firewall, but then you would have to configure internal authentication in Radicale with separate user accounts and also handle TLS certificates. That’s no good. But CalDAV and CardDAV is just HTTP and I already have an HTTP server, Apache. So let’s configure Apache as a proxy.
We also have users and passwords in the database from the e-mail server, so we’ll use them as well. I am using Postfixadmin to administer e-mail accounts, so the database structure is the one set-up by Postfixadmin. We’ll create a separate database user for Radicale:
psql -U postgres -d postfix
postfix=# create role radicale with login encrypted password 'mypassword';
CREATE ROLE
postfix=# grant select on mailbox to radicale;
GRANT
postfix=# \d mailbox
                                         Table "public.mailbox"
     Column     |           Type           |                         Modifiers
----------------+--------------------------+------------------------------------------------------------
 username       | character varying(255)   | not null
 password       | character varying(255)   | not null default ''::character varying
 name           | character varying(255)   | not null default ''::character varying
 maildir        | character varying(255)   | not null default ''::character varying
 quota          | bigint                   | not null default 0
 created        | timestamp with time zone | default now()
 modified       | timestamp with time zone | default now()
 active         | boolean                  | not null default true
 domain         | character varying(255)   |
 local_part     | character varying(255)   | not null
 phone          | character varying(30)    | not null default ''::character varying
 email_other    | character varying(255)   | not null default ''::character varying
 token          | character varying(255)   | not null default ''::character varying
 token_validity | timestamp with time zone | default '2000-01-01 00:00:00+01'::timestamp with time zone
First, we need to tell Radicale that we will handle the user authentication upstream and that we will pass down the username in an HTTP header X-Remote-User from Apache proxy. In /etc/radicale/config, put this:
[auth]
type = http_x_remote_user
Then, we configure a new virtual host. You could do this just as well under your main domain as a separate path.
<VirtualHost *:443>
  ServerName cal.taborsky.cz

  # TLS config
  SSLEngine on
  SSLCertificateFile      /etc/letsencrypt/live/cal.taborsky.cz/cert.pem
  SSLCertificateKeyFile   /etc/letsencrypt/live/cal.taborsky.cz/privkey.pem
  SSLCertificateChainFile /etc/letsencrypt/live/cal.taborsky.cz/chain.pem
  SSLProtocol             all -SSLv3
  SSLCipherSuite          ECDHE-ECDSA-AES256-GCM-SHA384:ECDHE-RSA-AES256-GCM-SHA384:ECDHE-ECDSA-CHACHA20-POLY1305:ECDHE-RSA-CHACHA20-POLY1305:ECDHE-ECDSA-AES128-GCM-SHA256:ECDHE-RSA-AES128-GCM-SHA256:ECDHE-ECDSA-AES256-SHA384:ECDHE-RSA-AES256-SHA384:ECDHE-ECDSA-AES128-SHA256:ECDHE-RSA-AES128-SHA256
  SSLHonorCipherOrder     on
  SSLCompression          off

  # Configure database connection for authentication
  DBDriver pgsql
  DBDParams "host=localhost dbname=postfix user=radicale password=mypassword"

  <Location "/radicale/">
    # Pass everything to Radicale server
    ProxyPass        http://localhost:5232/
    ProxyPassReverse http://localhost:5232/

    # Configure athentication from database and use cache for better performance
    AuthDBDUserPWQuery "SELECT password FROM mailbox WHERE username = %s AND active='1'"
    AuthType Basic
    AuthName "Radicale - Password required"
    AuthBasicProvider socache dbd
    AuthnCacheProvideFor dbd
    AuthnCacheContext my-server
    Require valid-user

    # Pass user to Radicale and also the path where we live
    RequestHeader    set X-Remote-User expr=%{REMOTE_USER}
    RequestHeader    set X-Script-Name /radicale/
  </Location>

  # Setup separate logging
  CustomLog /var/log/httpd/cal.taborsky.cz.log combined
  ErrorLog  /var/log/httpd/cal.taborsky.cz-error.log

  # These locations are useful for MacOS discovery
  Redirect "/.well-known/carddav" "/radicale/"
  Redirect "/.well-known/caldav" "/radicale/"
</VirtualHost>
After reloading Apache, the site should be ready. In my case, I went to https://cal.taborsky.cz/radicale/, logged in with my credentials I use for e-mail and was able to create an address book and a calendar. Theoretically that should be possible to do thru client software, but in standard MacOS apps I had no luck and needed to create them in the web interface.
Client setup
MacOS
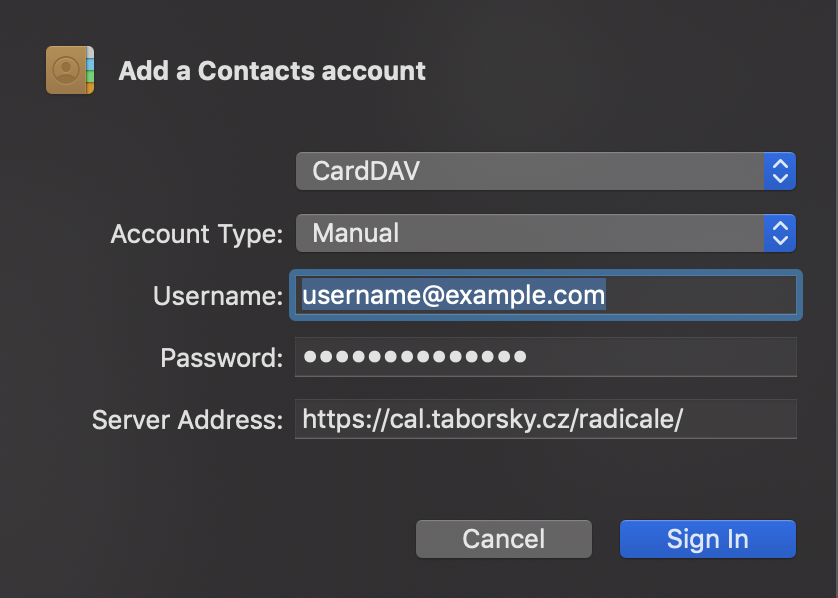
To add the new address book to the standard Contacts app, click the Add account in Contacts menu. Select the Other Contacts account radiobutton and in the following dialog select CardDAV with Manual account type. Enter your username, password and server address.
The Calendar is basically identical, so I will not post the screenshot here, you’ll figure it out.
I am told that adding your custom CardDAV and CalDAV server on iOS also works.
Android
Ahh, here Google fights back. If you are using Android, it’s assumed you are using Google services. So there is no standard way to add your own contacts and calendar in the official apps. But luckily there is DavX. You can get it on Play Store for about 5 EUR or free via F-Droid.
Moving data
Last step was to move my data. For that, I used the good old Mozilla Thunderbird. I have not used it for many years. Last time I checked it was mostly abandoned, but it looks it got some new focus recently and it is being actively developed again. I exported my data from Google, which to Google’s benefit is straightforward and Google does a good job with allowing you to take your data elsewhere. I then imported it in Thunderbird into my new server. After checking the data was successfully imported, I deleted if from Google.
I do not plan on using Thunderbird on desktop, as the standard MacOS apps are good enough, but it looks like an interesting alternative and combines e-mail, calendar and contacts in one app. Maybe sometime later I will give it a closer look.
Summary
Same as with e-mail, running your own calendar and contacts is not super easy. Though the setup is easier than e-mail, it still requires a bit of work. The setup I have is good for a personal account or for a freelancer. In a company, you want things like centrally managed contacts alongside private ones, calendar scheduling and fine grained permissions. For that, you’d have to reach for a more complicated setup with robust opensource systems or commercial ones. But nobody said freedom is free, right?
Comments